On Windows 10, Microsoft no longer integrates the option to completely disable updates, but the update process will take place automatically. Now, to disable Windows 10 updates, block Windows 10 from automatically updating, or disable the automatic update feature on Windows 10, you will have to do it manually.
For most users, Windows Update will slow down the system, possibly causing incompatibility errors, and when you need to shut down, you have to wait for Windows to update for a long time and get annoyed... Below, we will guide you on how to disable the automatic update feature on Windows 10! Because Windows 10 is constantly updated, if method 1 does not work, try methods 2, 3...
1. Disable updates on Windows 10 using services.msc
I always use this method to disable Windows 10 updates, I have tested it on Education and Pro versions and it is OK, but it has disadvantages that I will mention below, you should combine it with method 2 for the best results.
To turn off updates on Windows 10, follow these instructions:
Step 1: Press Windows+R to open run > type services.msc > press Enter or press Windows+E and paste the following path into the path bar:
Control Panel\All Control Panel Items\Administrative Tools\services
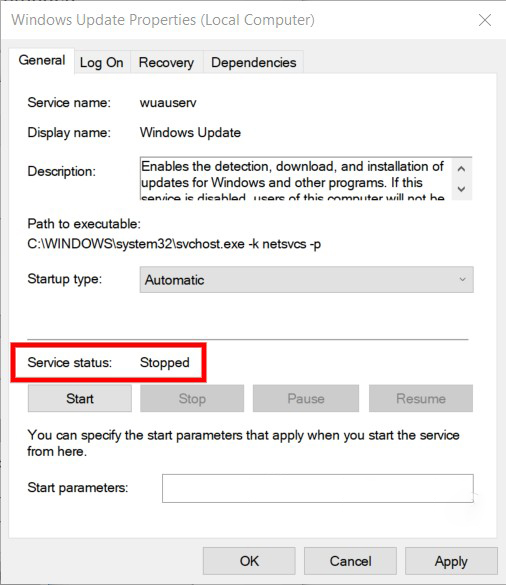
Step 2: Find the Windows Update section (scroll down to near the bottom), double-click it to open the Properties window.
Step 3: On the General tab, click Stop under Service status, then find Startup type > click the arrow in the box and select Disabled.
Step 4: Click OK to save changes, restart your computer and check Windows Update again.
Note: If you do it this way, Windows Defender will no longer be able to update, which is quite dangerous if your computer does not have any additional anti-virus software installed for Windows. If you just want to delay Windows 10 updates in the Startup Type section, you can choose Manual to manually update (it will notify you that there is an update but you have to click to install it yourself) or choose Automatic (Delayed Start) to wait until there is a complete update, then choose. Then Windows 10 will allow you to delay the update for 3 days, every 3 days you choose to postpone again.
On Windows 10 Pro and Education, some of you reported that method 1 did not work, it still updated automatically, I tried combining method 1 with method 2 below and it worked. If you encounter a similar situation, you should also do method 2.
2. Turn off Windows 10 updates using Group Policy Editor
To disable automatic updates on Windows 10, follow these steps:
Open Group Policy Editor, press Windows + R to open the Run command window, then type gpedit.msc and press Enter. If you are using Windows 10 Home, you may not find Group Policy Editor, follow method 1 or enable Group Policy Editor for Win 10 Home.
On the Group Policy Editor window, navigate to the key:
Computer Configuration > Administrative Templates > Windows Components > Windows Update
Find Configure Automatic Update, double click on it and select Disabled, then save the changes and you're done.
You can follow how to turn off Windows 10 update in the animation below:
3. Use EaseUS Tools M to block Windows 10 updates
If you want to block Windows 10 updates with just one click, you can try the free tool EaseUS Tools M. This tool allows you to enable/disable Windows Update, fix hard drive errors, remove/enable write-protection… in just a few seconds.
The steps are as follows:
Download EaseUS Tools M and install it on your computer. This tool has been tested by Quantrimang on Virus Total and no viruses were detected
Download link for EaseUS Tools M
To install EaseUS Tools M, just double-click on the downloaded toolsm.exe file, then click Next and wait to click Finish.
Next, run EaseUS Tools M and access Windows Update
The tool will automatically detect the status of the Windows Update service. If Windows Update is enabled, click Disable to block the update
To check if EaseUS Tools M is actually working, you can press the Windows button then type Services. Right-click on Services and select Run as administrator
In the list of services, find and right-click on Windows Update then select Properties. You will see that this service is stopped
You can also use EaseUS Tools M to clean your computer. This tool supports deleting junk files, temporary files to free up space and speed up your computer. In addition, it can also help you find and delete large files. Other features of EaseUS Tools M include fixing hard drive errors, removing/enabling write-protection.
4. Block Windows 10 updates for 365 days
In the Registry on Windows 10 1803, 1809, 1903, 1909, and 2004, there is an option to choose the specific version of Windows you want to use. That is, you can modify the Registry and make your device use a specific version of Windows 10, as long as that version is supported by Microsoft.
In addition, the ‘TargetReleaseVersionInfo’ entry in the Registry also allows users to disable downloading feature updates for up to 365 days. If you want to use a specific version of Windows 10, you can follow these steps to change the Registry:
Press Windows + R, type regedit.
Navigate to
HKEY_LOCAL_MACHINE\SOFTWARE\Policies\Microsoft\Windows\WindowsUpdate
Right-click on “Windows Update”.
Select “New”.
Select “DWORD (32-bit) Value” and name it TargetReleaseVersion.
Set the value of “TargetReleaseVersion” to 1.
Right-click on the “Windows Update” folder again.
Select “New” and click on “String Value”.
 |
| Đặt tên giá trị TargetReleaseVersionInfo |
Name it “TargetReleaseVersionInfo” and enter the Windows 10 version number as the value.
You can also enable this feature using PowerShell. To defer updates using PowerShell, run the following command:
reg add HKLM\SOFTWARE\Policies\Microsoft\Windows\WindowsUpdate /f /v TargetReleaseVersionInfo /t REG_SZ /d XXXX
In the above command syntax, you need to replace “XXXX” with the version of Windows 10 that you want to continue using.
 |
| Chọn phiên bản Windows |
This feature will be useful when a new update is forced to install on your device, or you have to delay the update to upgrade your device. For example, if you are on version 1903 and do not want to upgrade to version 2004, you can enter the value “1903” to stay on version 1903 or enter “1909” to be updated to version 1909.
5. Block Win 10 update in regedit
Type regedit in the search box, press Enter to open the registry window. Copy and paste the following path into the address bar right under the File|Edit|View|Favorites|Help menu:
HKEY_LOCAL_MACHINE\Software\Policies\Microsoft\Windows\WindowsUpdate\AU
Double click on NoAutoUpdate, in Value data, enter 1 and click OK as shown:
After completion, the value of NoAutoUpdate will be 0x00000001(1). If you want to let Windows 10 update automatically again, change the Value data in the above step to 0.
6. Pause Windows Update on Windows 10 via Settings
This way of turning off Windows 10 updates is only temporary, allowing you to postpone the update to a more suitable time, not completely turning off the update. The maximum postponement time is about 30 days each time.
You type Windows Update settings in the search bar.
The Windows Update interface opens, you find Advanced options:
Find Pause updates > Pause until > select the date you want to update Windows 10.
Find Pause updates > Pause until > select the date you want to update Windows 10.
7. Turn off Windows 10 updates via peer-to-peer
Another new feature in Windows 10 is the system that allows updates through peer-to-peer (p2p) computers. To put it simply: when updating, one computer will be considered the "server" computer, and other peers will update through that "server". This will help users save bandwidth, and the update will also be faster than downloading directly from the Internet. And to turn off this type of update, click on the link Choose how updates are delivered:

Switch the On mode to Off.
8. Pause updates on Windows 10
This method takes advantage of the Metered Connection feature, which only applies when you are using a wifi network. Simply put, it changes the wifi network to a data-limited network, causing Windows 10 to delay updates until you switch to an unrestricted network.
To enable the Set as metered connection option, follow these steps:
1. On your Windows 10 computer, open the Start Menu.
2. Go to Settings.
3. When the Settings window opens, click on Network & Internet.
4. Click on Wi-Fi in the left pane.
5. Now, click on Manage known networks.
6. Click on the wireless connection name > click the Properties button.
7. Now, scroll down to find the Metered Connections heading.
8. Then turn on the Set as metered connection button.
This way, you can pause Windows 10 updates for a while in case you have run out of your monthly usage.
9. Block specific Windows 10 updates
There is a “show or hide updates” tool on the Windows website that allows users to disable or hide specific Windows 10 updates. Simply download the tool and install it. Follow the instructions and disable the problematic updates.
Good luck.


